Driver.js(新用户引导)
made with JavaScript
Driver.js(新用户引导)
这是一个功能强大且高度可定制的基于原生JavaScript开发的新用户引导库。
简介及使用教程
Driver.js是一个功能强大且高度可定制的基于原生JavaScript开发的新用户引导库。它没有依赖项,支持所有主要浏览器。
特点:
- 简单:简单易用,完全没有外部依赖
- 高度可定制:有一个强大的api,可以用于你希望突出显示任何内容
- 高亮显示:页面功能介绍上的任意元素(字面上的任意)
- 功能介绍:为你的web应用程序创建强大的功能介绍
- 焦点移位器:为用户友好添加焦点移位器
- 用户友好:通过键盘行为控制一切
- 一致行为:所有浏览器(包括著名的IE)都可以使用
- MIT声明:免费用于个人和商业用途。
安装
Npm
npm i driver.js
Yarn
yarn add driver.js
浏览器
<script src="https://unpkg.com/driver.js/dist/driver.min.js"></script>
<link rel="stylesheet" href="https://unpkg.com/driver.js/dist/driver.min.css">


<!-- 或者 -->
<link rel="stylesheet" href="/dist/driver.min.css">
<script src="/dist/driver.min.js"></script>
使用
引入
import Driver from 'driver.js';
import 'driver.js/dist/driver.min.css';
简单示例
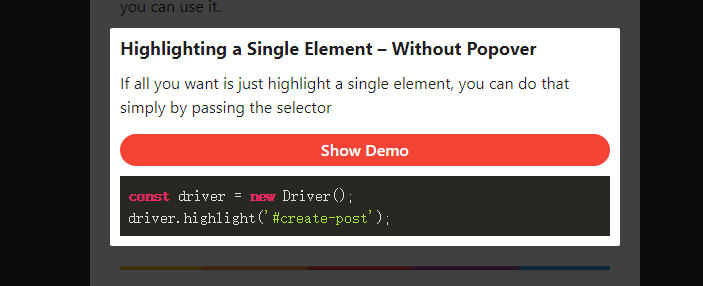
const driver = new Driver();
driver.highlight('#create-post');
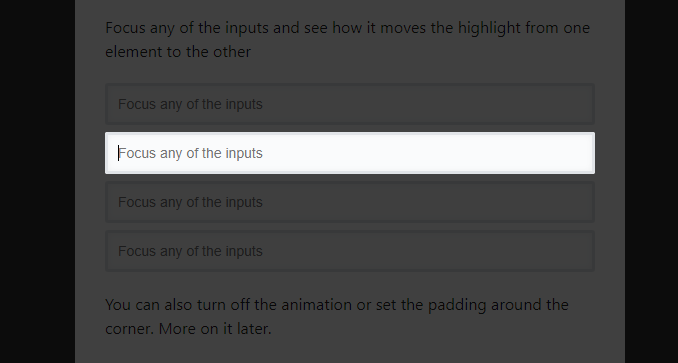
交互时高亮元素
const focusDriver = new Driver();

// Highlight the section on focus
document.getElementById('creation-input')
  .addEventListener('focus', (e) => {
    focusDriver.focus('#creation-input');
  });
带弹窗
const driver = new Driver();
driver.highlight({
  element: '#some-element',
  popover: {
    title: 'Title for the Popover',
    description: 'Description for it',
  }
});
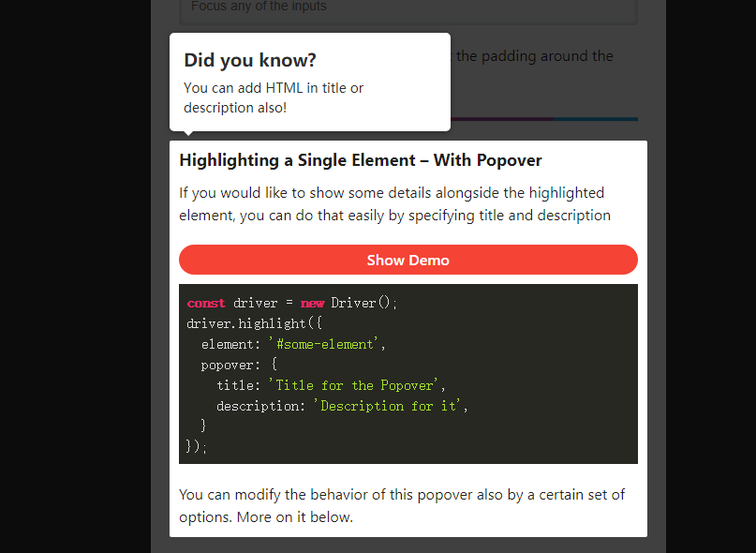
弹窗支持定义位置、HTML内容等
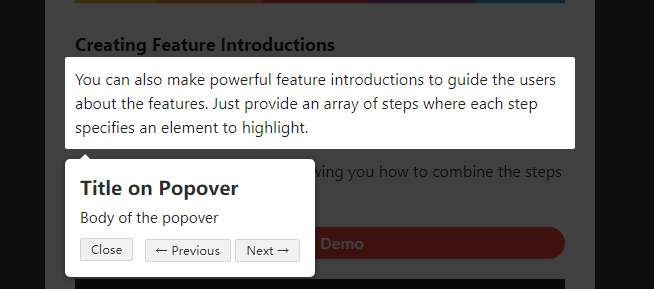
创建功能介绍
const driver = new Driver();
// Define the steps for introduction
driver.defineSteps([
  {
    element: '#first-element-introduction',
    popover: {
      className: 'first-step-popover-class',
      title: 'Title on Popover',
      description: 'Body of the popover',
      position: 'left'
    }
  },
  {
    element: '#second-element-introduction',
    popover: {
      title: 'Title on Popover',
      description: 'Body of the popover',
      position: 'top'
    }
  },
  {
    element: '#third-element-introduction',
    popover: {
      title: 'Title on Popover',
      description: 'Body of the popover',
      position: 'right'
    }
  },
]);
// Start the introduction
driver.start();
选项
Driver 选项
const driver = new Driver({
  className: 'scoped-class', //包裹driver.js弹窗的类名 className to wrap driver.js popover
  animate: true,  // 高亮元素改变时是否显示动画 Animate while changing highlighted element
  opacity: 0.75,  //背景透明度(0 表示只有弹窗并且没有遮罩) Background opacity (0 means only popovers and without overlay)
  padding: 10,   //  元素与边缘的距离 Distance of element from around the edges
  allowClose: true, // 是否允许点击遮罩时关闭 Whether clicking on overlay should close or not
  overlayClickNext: false, //是否允许点击遮罩时移到到下一步 Should it move to next step on overlay click
  doneBtnText: 'Done', // 最终按钮上的文本 Text on the final button
  closeBtnText: 'Close', // 当前步骤关闭按钮上的文本 Text on the close button for this step
  nextBtnText: 'Next', //当前步骤下一步按钮上的文本 Next button text for this step
  prevBtnText: 'Previous', // 当前步骤上一步按钮上的文本 Previous button text for this step
  showButtons: false, //是否在底部显示控制按钮 Do not show control buttons in footer
  keyboardControl: true, // 是否允许通告键盘控制(escape关闭,箭头键用于移动)Allow controlling through keyboard (escape to close, arrow keys to move)
  scrollIntoViewOptions: {}, //  `scrollIntoView()` 方法的选项 We use `scrollIntoView()` when possible, pass here the options for it if you want any
  onHighlightStarted: (Element) {}, // 元素开将要高亮时调用Called when element is about to be highlighted
  onHighlighted: (Element) {}, // 元素开完全高亮时调用Called when element is fully highlighted
  onDeselected: (Element) {}, // 取消选择时调用 Called when element has been deselected
  onReset: (Element) {},        // 遮罩将要关闭时调用 Called when overlay is about to be cleared
  onNext: (Element) => {},      // 任何步骤中移到到下一步时调用Called when moving to next step on any step
  onPrevious: (Element) => {},  // 任何步骤中移到到上一步时调用Called when moving to next step on any step
});
step 选项
const stepDefinition = {
  element: '#some-item',        // 需要被高亮的查询选择器字符或Node。 Query selector string or Node to be highlighted
  popover: {                    // 如果为空将不会显示弹窗There will be no popover if empty or not given
    className: 'popover-class', // 除了Driver选项中的通用类名称之外,还可以指定包裹当前指定步骤弹窗的类名  className to wrap this specific step popover in addition to the general className in Driver options
    title: 'Title',             // 弹窗的标题 Title on the popover
    description: 'Description', // 弹窗的主体内容 Body of the popover
    showButtons: false,         // 是否在底部显示控制按钮 Do not show control buttons in footer
    closeBtnText: 'Close',      // 关闭按钮的文本 Text on the close button for this step
    nextBtnText: 'Next',        // 当前步骤的下一步按钮文本 Next button text for this step
    prevBtnText: 'Previous',    // 当前步骤的上一步按钮文本 Previous button text for this step
  }
};
API方法
const driver = new Driver(driverOptions);

const isActivated = driver.isActivated; // 检查driver是否激活Checks if the driver is active or not
driver.moveNext();     // 移动到步骤列表中的下一步 Moves to next step in the steps list
driver.movePrevious(); // 移动到步骤列表中的上一步 Moves to previous step in the steps list
driver.start(stepNumber = 0);  // 从指定的步骤开始 Starts driving through the defined steps
driver.highlight(string|stepDefinition); // 高亮通过查询选择器指定的或步骤定义的元素 highlights the element using query selector or the step definition
driver.reset(); // 重置遮罩并且清屏Resets the overlay and clears the screen
driver.hasHighlightedElement(); //检查是否有高亮元素 Checks if there is any highlighted element
driver.hasNextStep(); // 检查是否有可移动到的下一步元素 Checks if there is next step to move to
driver.hasPreviousStep(); // 检查是否有可移动到的上一步元素。Checks if there is previous step to move to

driver.preventMove();// 阻止当前移动。如果要执行某些异步任务并手动移动到下一步,则在“onNext”或“onPrevious”中很有用 Prevents the current move. Useful in `onNext` or `onPrevious` if you want to
// perform some asynchronous task and manually move to next step


const activeElement = driver.getHighlightedElement();// 获取屏幕上当前高亮元素 Gets the currently highlighted element on screen
const lastActiveElement = driver.getLastHighlightedElement();
activeElement.getCalculatedPosition(); // 获取活动元素的屏幕坐标Gets screen co-ordinates of the active element
activeElement.hidePopover();  // 隐藏弹窗Hide the popover
activeElement.showPopover();  // 显示弹窗Show the popover

activeElement.getNode();  // 获取此元素后面的DOM元素Gets the DOM Element behind this element
你可以使用各种各样的选项来实现你想要的一切。You can use a variety of options to achieve whatever you may want.
作者
Kamran Ahmed

相关项目
没有更多信息
我要推荐一个